How to Play?
Wasteland Explorer!
Welcome to the Blastborn tutorial, where survival is only for the boldest. In this post-apocalyptic world, every decision can mean the difference between glory and defeat.
Dive into the game rules and uncover the strategic skills needed to triumph amidst chaos. From building your deck to mastering the special abilities of your cards, here you will find everything you need to become a true master of the Wasteland.
Are you ready to face the ruthless foes lurking in this desolate world? Join us and forge your destiny in Blastborn. Let the battle begin!
Cards and Their Characteristics
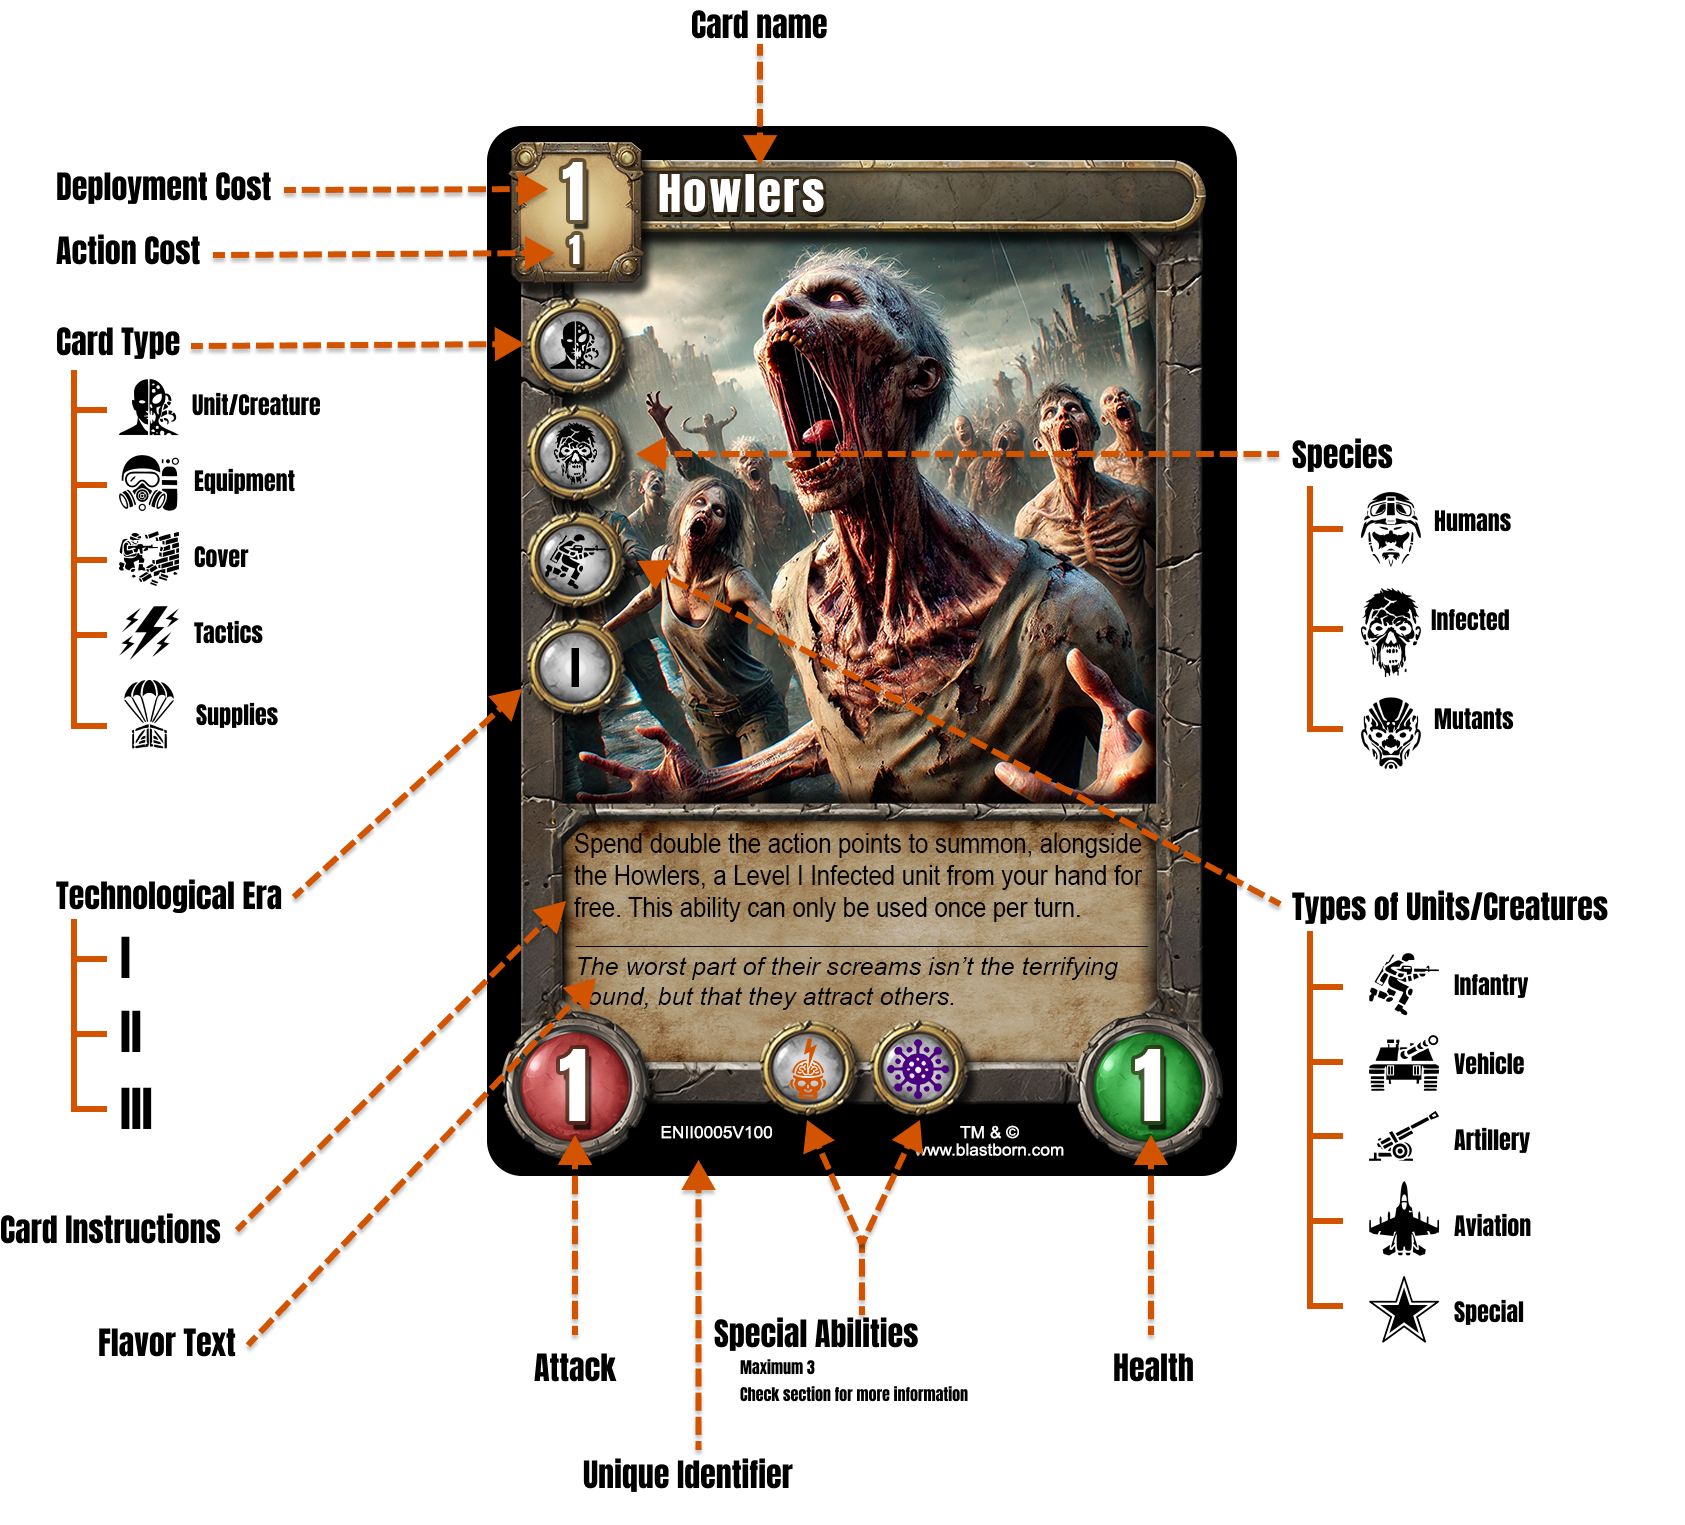
Main Types of Cards
CREATURES AND UNITS
Creature or unit cards are the very essence of conflict. They represent beings of all shapes and sizes, imbued with varying levels of power and unique abilities. The damage inflicted and received by these creatures depends on a complex interaction between their form, strength, and the very nature of combat.
When a creature enters the battlefield, it undergoes a brief adaptation period known as "deployment fatigue," during which it cannot attack. However, it is ready to take damage if attacked by the enemy. When a creature decides to launch an attack, its objective is clear: to deal direct damage to the opponent. If its attack is not blocked, the damage dealt will be equivalent to its Attack value. However, if the creature takes damage equal to or greater than its Life value in a single turn, it will succumb to its injuries. Fortunately, surviving creatures recover at the end of each turn, ready to fight once more in the next round.

COVERAGES
Amidst the chaos of battle, coverage cards represent elements and structures from the environment that your creatures and units discover and adapt to their advantage. These strategic resources can be leveraged to protect, strengthen, or even launch attacks, adding a new layer of tactical complexity to the conflict.
When a creature or unit benefits from a coverage card, it is placed beneath them, granting significant boosts to their basic stats. These enhancements can range from increased resistance to improved attack power, depending on the type of coverage used. With the right coverage, your forces can withstand even the fiercest enemy onslaughts.
If the unit or creature moves from the battle line or is destroyed, it will lose the coverage. A unit or creature can only have one coverage element equipped at a time.


EQUIPMENT
In your tactical arsenal, equipment cards represent tools, artifacts, and devices that can be used to enhance your battle strategies. These cards provide special abilities that can strengthen your units, add additional damage, or grant special capabilities to dominate the battlefield.
Most equipment is not tied to a specific faction, allowing you to equip it freely. However, some equipment may be restricted to certain factions, requiring careful planning of your strategies.
If the unit or creature moves from the battle line, it will retain the equipment. However, if it is destroyed, the equipment will also be destroyed. A unit or creature can only have one piece of equipment equipped at a time.


EQUIPMENT + COVERAGE
A creature or unit can be equipped simultaneously with both equipment and coverage. However, if this creature or unit moves or is destroyed, the rules outlined in their respective previous sections will apply.

TACTICS
Amidst the turmoil of combat, instant tactic cards provide an opportunity to change the course of battle in an instant. With powerful and short-lived effects, these cards are ideal for disrupting enemy strategies or enhancing your own tactics.
Tactics are deployed at the right moment to perform a wide range of actions, from dealing direct damage to destroying enemy units. Remember, these cards are played during the main phases of your turn and are discarded after use, requiring careful planning of their application.

SUPPLIES
Supply cards represent the vital resources needed to deploy and maintain your forces on the battlefield. They are essential for the operation of your army and provide the necessary foundation to successfully execute your strategies.
Play a supply card on your turn to increase your resource pool, enabling you to deploy more units, activate their actions, and execute more powerful tactics. Plan wisely when to play them to maximize their impact on the battlefield, and protect them, as losing all your supply cards will result in an immediate defeat.
Players must agree at the start of the game on the maximum number of supply cards that can be deployed simultaneously. By default, a limit of 3 cards per player is recommended, the same for both.
If a player already has the maximum number of supply cards in their LOGISTICS line and holds a card in their hand that provides more supplies than the current ones, they may replace it. The previous card will go to the Pit.
At the start of every Blastborn game, both players begin with a base supply of 10, which decreases by 1 each turn until it reaches 0. If a player has no supply cards when their base supply reaches 0, they will automatically lose. Therefore, players must build their logistics lines with supply cards as early as possible, even if it means risking defeat if the enemy destroys them.

The Battlefield
In Blastborn, the battlefield is divided into several zones, with each player having three lines, making a total of six lines. Understanding the dynamics of each zone and their importance is crucial for developing your battle strategy.

These lines or zones are:
VANGUARD
This line represents the main frontline of battle, being the closest part to the enemy. This is where the most intense and brutal combats take place.
If a player has no units or creatures in their VANGUARD line, the opponent can attack from their own VANGUARD to the next line of the player that has enemies.
REARGUARD
Positioned behind the vanguard line, the rearguard is relatively protected from direct enemy attacks, as long as you maintain control over your vanguard line. This is where you deploy your new units and creatures. Additionally, it is the ideal place to position long-range attack units, such as artillery.
LOGISTICS
The player's last line, located behind the rearguard. Here, special units that provide bonuses to your entire army, as well as field structures and aviation units like fighters and bombers, are placed. This line is crucial for maintaining supplies and supporting your forces on the battlefield. It is also in this line where the vital point of any army lies: the supply lines, represented by supply cards, the most important element in Blastborn matches. If the enemy manages to destroy all these cards, it will result in immediate defeat.
NO MAN'S LAND
On the edges of the battlefield lies the mysterious "No Man's Land." These uncontrolled stretches of terrain represent the flanks of your forces and those of your opponent. In these zones, unaffiliated forces may appear, drawn by the clash of battle. These enemies have a clear purpose: to attack the closest unit in the strategic line where they appear.
For Gaia's wild creatures to emerge, the sum of the deployment numbers of units in the same line must be equal to or greater than 10. If this condition is met, the player must roll the Gaia die at the start of their turn. A good strategy is to spread your forces between the VANGUARD and REARGUARD lines to delay the appearance of Gaia's creatures as long as possible.
To determine if an enemy appears in No Man's Land, a six-sided die is rolled. If the result is a 1 or 2, an enemy will emerge to join the conflict; otherwise, none will appear. The appearance zone is determined by another roll of the same die: numbers 1, 2, 3, and 4 represent the player's flanks, always counted from left to right from the perspective of the player rolling the dice. If the number on the second roll is 5 or 6, it is considered that no creature will appear, even if the first roll indicated otherwise.
In the "Your Deck" section, you can download Gaia tokens, which help players remember that they have exceeded the value needed for Gaia's creatures to appear.

")


STRATEGIC RESERVE
The "Reserve" represents a player's main deck, where all the selected cards for the match are stored, including creatures, support cards, supplies, and other strategic card types.
PIT OF THE FALLEN
The "Pit" is where cards that have been used, discarded, or destroyed during the game are sent. These cards remain visible in the Pit and can be retrieved or used through special effects that allow playing cards from this zone. Keeping track of the cards in the Pit is crucial to understanding the game's dynamics and developing effective strategies.
LOSING LINES AND ITS CONSEQUENCES
If a player has no creatures or units in their Vanguard and/or Rearguard lines, those lines will be considered nonexistent. Lines only exist if the player has units or creatures controlling them. If the line does not exist, the enemy can attack without taking it into account when calculating the attack range of their own units.
A player who does not control their REARGUARD line will immediately gain control over the line when deploying a unit or creature. Furthermore, they will be able to attack or move during the same deployment turn without being affected by "deployment fatigue."


How Special Abilities of Creatures and Units Work
In the game, all units and creatures have a normal attack, which is the basic damage value indicated on the card. To perform it, the player must pay the action cost shown on the card (top left corner, small number). Additionally, each unit has a life value representing its resilience. If a unit takes damage equal to or greater than its life value during a turn, it will be eliminated. However, if it is not eliminated by the end of the turn, its life will fully restore at the beginning of the next turn.
Some units and creatures also have special abilities, allowing them to perform special attacks or have special defenses.
Special Attacks (Offensive Abilities)
Units with offensive abilities can choose to perform a special attack during their turn. This type of attack deals double the damage of a normal attack, but it comes at a cost: the player must pay double the action points to activate it. It is important to note that using these special attacks is optional, allowing the player to strategically decide the best moment to use them.
| Number | Name | Icon | Description |
|---|---|---|---|
| 1 | Incendiary |
|
2x normal attack damage (base damage only) - New specific abilities coming soon. |
| 2 | Freezing |
|
2x normal attack damage (base damage only) - New specific abilities coming soon. |
| 3 | Super-kinetic |
|
2x normal attack damage (base damage only) - New specific abilities coming soon. |
| 4 | NT virus infection |
|
If a creature is eliminated by an opponent with this ability, the attacking player may take the first creature card from their Pit with the same or lower deployment number and play it immediately, without cost and without deployment fatigue. |
| 5 | Psychological |
|
2x normal attack damage (base damage only) - New specific abilities coming soon. |
| 6 | Electric |
|
2x normal attack damage (base damage only) - New specific abilities coming soon. |
| 7 | Laser |
|
2x normal attack damage (base damage only) - New specific abilities coming soon. |
| 8 | Plasma |
|
2x normal attack damage (base damage only) - New specific abilities coming soon. |
| 9 | Biological |
|
2x normal attack damage (base damage only) - New specific abilities coming soon. |
| 10 | Chemical |
|
2x normal attack damage (base damage only) - New specific abilities coming soon. |
| 11 | Nuclear |
|
2x normal attack damage (base damage only) - New specific abilities coming soon. |
| 12 | Cybernetic |
|
2x normal attack damage (base damage only) - New specific abilities coming soon. |
| 13 | Psionic |
|
2x normal attack damage (base damage only) - New specific abilities coming soon. |
| 14 | Evasion |
|
A player attacking a creature with this ability must roll a six-sided die. If the result is 1, 2, or 3, the attack will be successful; if the result is 4, 5, or 6, the attack will fail. In both cases, the action cost must be paid. |
Special Defenses (Defensive Abilities)
Some units or creatures have defensive abilities that make them completely immune to certain types of special attacks. If a unit has a defense against a specific type of special attack (e.g., NBC Protection), it will be invulnerable to any offensive attack from that ability group. This means it will not take any damage from those attacks. However, it will not be invulnerable to normal attacks.
| Number | Name | Icon | Description |
|---|---|---|---|
| 1 | Armor |
|
Total invulnerability to special attacks from this ability group. |
| 2 | Immunity to the NT virus |
|
Total invulnerability to special attacks from this ability group. |
| 3 | Courage |
|
Total invulnerability to special attacks from this ability group. |
| 4 | Energy shield |
|
Total invulnerability to special attacks from this ability group. |
| 5 | NBC protection |
|
Total invulnerability to special attacks from this ability group. |
| 6 | Cyber defense |
|
Total invulnerability to special attacks from this ability group. |
| 7 | Target fixation |
|
If a unit with Evasion is attacked, the attack will always be successful (no dice roll required). |
Additional Requirements Needed
Some special abilities require one or more prerequisites to be launched or to allow the blocking of a special or normal attack.
| Number | Name | Icon | Description |
|---|---|---|---|
| 1 | Required Dice |
|
Abilities that require rolling a 6-sided die to execute. The values that allow the attack are 1, 2, and 3. Regardless of whether the attack is possible or not, the supply action cost must be paid. |
Ability and Defense Groups
Special attacks are grouped into categories such as nuclear, chemical, or biological. For each group of offensive abilities, there is a specific defense that can completely block all attacks from that group. For example, a unit with NBC Protection is completely immune to any nuclear, biological, or chemical attack.
To simplify gameplay, each ability group is associated with a specific color. For example, the NBC group is represented by the color green. This allows players to quickly identify which attacks belong to each group and which defense is effective against them.
 and their blocking relationships. Red arrows indicate which offensive abilities can be completely blocked by defensive abilities. Black arrows pointing to the die represent offensive abilities that can only occur if a six-sided die roll results in 1, 2, or 3.")
Victory Condition
Victory in a battle is achieved when all supply cards in the opponent's logistics line are destroyed. Once this condition is met, the enemy will be unable to sustain the conflict, resulting in their automatic defeat, even if they still have units on the battlefield.
Prepare Your Deck
DIVERSIFY YOUR STRATEGY: CREATURES/UNITS AND TACTICAL CARDS
Once you have chosen your faction, it’s time to explore the cards available within that faction. The choice can be challenging, as each faction has its own strengths and weaknesses that you will discover as you progress. But don’t worry, you can always return to this platform to download cards from other factions if you wish. The important thing when starting to build decks is that it’s a fun experience. For now, you just need a starting point.
Most decks include both tactical cards and creatures/units. As you review your collection, consider both the creatures and tactical cards you want to include. There are several reasons for this:
Add variety to your gameplay. Relying solely on creatures/units can become monotonous, while depending exclusively on tactical cards may lead to quick defeats for novice players.
Keep your opponent guessing. If your opponent knows you’re only going to play creatures/units, it will be easier for them to predict your moves. However, by including tactical cards, your opponent will need to remain vigilant for potential threats both inside and outside of combat. Keeping your opponents off balance will increase your chances of victory.
For your first decks, I recommend including approximately 25 creatures/units, 10 tactical cards, 5 coverage cards, 5 equipment cards, and 15 supply cards. These figures are just suggestions and can be adjusted according to your play style and personal preferences. All the advice here is meant as simple guidelines, not strict rules. Explore, experiment, and enjoy the process of building your deck in Blastborn!
MINIMUM AND MAXIMUM DECK SIZE
In Blastborn, the number of cards in your deck follows simple rules to ensure balanced and fair matches:
Minimum: Your deck must contain at least 60 cards.
Maximum: There is no maximum limit to the number of cards you can include, but you must be able to shuffle your deck without external assistance. This means that while you can add more cards, you should ensure your deck remains manageable during the game.
LIMIT ON IDENTICAL CARDS
By default, each player may have a maximum of 3 copies of any card in their deck. Some specific cards may have a lower limit than 3, which will be indicated in the card’s instructions.
HOW MANY SUPPLY CARDS DO I NEED?
After selecting the creatures/units, coverage cards, instant tactics, and equipment for your deck, it’s time to determine how many supply cards to include.
Determining the exact number of supply cards can be tricky and depends on various factors. However, here’s a basic rule: add up the deployment costs of all your cards and multiply the total by 2. This will be the minimum recommended supply value your supply cards should provide to ensure balanced gameplay.
SUPPLY CURVE
In this game, players deploy survivors, vehicles, and strategic supplies to face off in battle.
The key to victory in Blastborn lies in the efficient management of resources. Each card requires a certain amount of resources to be played; these resources are called supplies, and having a proper supply curve is crucial to ensure an effective response in every turn.
The supply curve represents the distribution of the amount of resources or supplies required by the cards in the deck. As in other card games, having a balanced curve is fundamental to optimizing deck performance. It is essential to include a variety of cards with different resource costs to ensure relevant options can be played at every stage of the game.
For example, having too many high-cost cards may lead to situations where the player cannot deploy anything for several turns, leaving them vulnerable to the opponent's attacks. On the other hand, an excess of low-cost cards may result in a lack of power as the game progresses.
In Blastborn, adaptability is key. Players must be able to adjust their strategy based on available resources and changing battlefield conditions. This means that, in addition to considering the supply curve, it’s also important to account for the ability to generate and conserve resources during the game.
In summary, in the post-apocalyptic world of Blastborn, the supply curve is a fundamental concept that determines a deck’s effectiveness and versatility. Players must learn to carefully balance their resources to ensure survival and achieve victory in this ruthless and challenging strategy game.
MASTER THE ART OF DECK BUILDING
These introductory guidelines are just the starting point on your journey to mastery. Have you already selected which cards you want to include for each type? Fantastic! Now, gather them all into a deck and dive into the game. Experiment and discover which strategies work best and which ones need adjustments. Keep an open mind to potential changes and improvements.
The skill to build exceptional decks requires practice and dedication. Your first attempts may not go as planned, but that’s part of the fun in Blastborn! Embrace the process with passion and enjoy every step of the journey toward strategic perfection.
You’ll find that creating your own decks is fun, and even more exciting when you manage to defeat your friends with them.
Basic Mechanics
ACTIVATING TACTICAL CARDS
To use your tactical cards, pay their supply cost and apply their effect immediately.
INACTIVE CARDS
Inactive cards cannot be used during the current turn and remain in a horizontal position to clearly indicate their status. Despite being inactive, these cards can be targeted by enemy attacks and take damage. At the beginning of the next turn, the player must place these cards in a vertical position, indicating they have exited the inactive state and are ready to be used.
This inactive state generally affects unit or creature cards due to their deployment on the battlefield, which causes "deployment fatigue" that sets their initial status as inactive cards. However, some cards have a special ability that allows them to avoid "deployment fatigue" and enter the game in an active state.
Additionally, if a player does not control their vanguard line, units or creatures deployed in the rearguard line will not suffer "deployment fatigue" and can be used immediately.

DEPLOY
To bring your creatures/units into play, pay the cost indicated in the top left corner of the larger card. This places them in the rearguard line. Keep in mind that you won’t be able to perform additional actions with this card during the same turn due to "deployment fatigue."

MOVE
To change the position of your creatures/units, pay the action cost shown in the top left corner with the smallest number. This allows them to move between adjacent battle lines, both forward and backward.


ATTACK
To launch an attack with your creatures or units, pay the action cost (the smallest number in the top left corner). This allows your creature/unit to deal damage to an opponent's creature/unit as indicated in the bottom left corner of the card. If this number exceeds the Life value of the enemy creature during the attack turn, it will be defeated. Keep in mind that you can perform multiple attacks with the same creature/unit if you have the necessary supplies, or you can attack a single enemy creature/unit with multiple of your own. Attacks can be launched against adjacent lines – for example, a creature in the VANGUARD line could attack either the enemy's VANGUARD line or its own REARGUARD line (this is useful in cases of enemy infiltration).

Some units have the ability to attack from long range, such as artillery and aviation:
Artillery can fire at the line beyond the adjacent one but not at the adjacent line. For this reason, it must be protected.
Aviation can attack both adjacent lines and the two beyond them.


HAND LIMIT
Each player can have a maximum of 10 cards in their hand. If this limit is exceeded, the player must return the excess cards to the bottom of their Reserve deck.
Turns and Main Phases
Starting the Game
Player Definition: At the beginning of the game, players must determine who will be Player 1 and who will be Player 2. This can be done randomly (such as flipping a coin) or using any other method agreed upon by both players.
Starting Hands:
- Player 1 (who goes first) draws 6 cards from their Reserve.
- Player 2 draws 7 cards, giving them an initial resource advantage to compensate for not playing first.
Starting Supplies:
Both players start with 10 supply units available in their first turn. These supplies are used to play cards and activate effects.
Supply Decrease:
Starting from the second turn, the amount of supplies players receive decreases by 1 unit per turn:
- On the second turn, both players will receive 9 supply units.
- On the third turn, they will receive 8 supply units, and so on.
- This continues until, by the tenth turn, players will no longer receive additional supplies (0 supplies).

Supply Lines:
Players must have built their own supply lines before the tenth turn. If they fail to do so, they will not have additional supplies to play new cards or activate effects, leaving them without resources to effectively continue the game.
Turn Phases
Each turn consists of the following phases. Once a player advances to a new phase, they cannot return to a previous phase.
Initial Phase:
- Draw a Card: The player draws one card from their Reserve.
- Receive Decreasing Supplies: Players receive their supply tokens for the turn. In the first turn, each player receives 10 supply tokens.
- Receive Generated Supplies: In addition to the base tokens, players must add the supplies generated by any logistics cards they have in their play area.
- Adjust Counter: Players must adjust their decreasing supply counter, moving the marker from 10 to 9, to indicate that they will receive 9 supplies in their next turn. This process repeats each turn, decreasing by 1 unit per turn until it reaches 0 supplies.
- Card Activation: Turn all horizontally positioned (inactive) cards to a vertical position.
- Gaia Creatures: Check if the requirement for Gaia creatures to appear on the player's field is met. For more details on the specific criteria and conditions, consult the "No Man's Land" section under "The Battlefield."
Action Phase:
During this phase, the player can perform as many actions as their supplies allow, including:
- Play Cards: Play cards from their hand, such as units, creatures, supply cards, coverages, equipment, or tactic cards.
- Activate Abilities: Activate abilities of cards in play.
- Buy Cards: Any player can spend 5 supplies to draw 1 card from their Reserve deck.
Combat Phase:
- Declare Attacks: The player can declare attacks with units and creatures that are not restricted by "deployment fatigue" or other limitations.
- Attack Sequence: Attacks are not alternated between players; the active player performs all their attacks in a single step.
- Opponent Reactions: The opponent can only react during their own turn if they have the means to do so.
Final Phase:
- Final Effects: Activate effects of tactic cards that occur at the end of the turn.
- End of Turn: The turn concludes, and it becomes Player 2's turn, following the exact same phases described above.
How to Download and Print Your Cards
Card Download: From the "Your Deck" section on our website, select the cards from the species you want and download them in PDF format for printing.
Printing at Home or a Print Shop: You can print your cards at home or at a print shop. Important: make sure the printer is set to print at "Actual Size", otherwise margins will be added, and the card sizes will be affected. The official card size is 6.35 x 8.89 cm.
Card Cutting: After printing, cut the cards along the red lines using scissors. However, if you plan to prepare multiple decks, we recommend using an A4 paper cutter for faster and more precise cuts.
Protective Sleeves: For greater protection and durability, use 66 x 91 mm sleeves designed for cards of 64 x 89 mm. Both sleeves and lamination provide good structural consistency to the cards, but sleeves allow you to reuse them if you decide to modify or enhance your deck with new cards or future expansions without incurring additional costs.
Recommended Products for Printing Your Decks
| Product | Description | Link |
|---|---|---|
| A4 paper cutter (option 1) | Ideal for cutting many cards comfortably and precisely. | Buy |
| A4 paper cutter (option 2) | Another cutting option, more compact and suitable for smaller batches. | Buy |
| Precision Scissors (Right-handed) | Recommended for manually cutting cards with better control. | Buy |
| Precision Scissors (Left-handed) | Designed for left-handed users to ensure proper cutting visibility and comfort. | Buy |
| Matte Sleeves (50) | Matte finish sleeves, perfect for standard-size TCG cards. | Buy |
| Gamegenic Value Pack Matte (200) | Premium matte sleeves for a more vibrant card presentation. | Buy |
| Gamegenic Prime Sleeves (200) | High-value sleeve pack for multiple decks or group use. | Buy |
| TitanShield Sleeves (150) | Durable premium sleeves compatible with most TCGs. | Buy |
Notice: The links in the table will take you to Amazon and are affiliate links. This means that if you decide to make a purchase through these links, a small commission will be allocated to fund the Blastborn project at no additional cost to you. Every contribution helps us continue improving the game!
Additionally, consider that lamination is another viable option, but in our experience, sleeves tend to be a more flexible and cost-effective choice for players who wish to update their decks in the future.


Conclusion
Congratulations on completing this section of the Blastborn rules!
I hope these rules have provided you with a clear and comprehensive understanding of how to play this exciting card game. I know it may seem overwhelming at first, but with practice and experience, you'll become a master strategist.
Remember that Blastborn is a game in constant evolution and creation. I greatly value the opinions and suggestions of the player community, so any ideas you share will be considered for future modifications and updates to the game.
Additionally, we encourage you to visit our website regularly, as we will be releasing time-limited exclusive cards for all players. Don’t miss the chance to add new and exciting cards to your deck!
Thank you for being part of the Blastborn community. See you on the battlefield!